
How Rapidly Switching Between Heat and Cool Modes Damages Your Reversing Valve
Crisp fall mornings and warm afternoons make it tempting to constantly flip your thermostat. Giving your heat pump a brief rest between cycles prevents system lockouts and costly valve damage.

The Early Fall Thermostat Trap: Why Chilly Mornings and Warm Afternoons Threaten Your System
The September shoulder season brings crisp, chilly mornings that make you want to turn on the furnace, but understanding how rapidly switching between heat and cool modes damages your reversing valve is critical before you touch that dial. It is a common scenario: you wake up to a cold house and bump the heat up. By mid-afternoon, the sun is beating down, the indoor temperature climbs to 80 degrees, and you immediately flip the system over to air conditioning to find some relief.
To learn more about keeping your equipment running smoothly through these seasonal shifts, explore our heat pump systems and professional heat pump services.
Modern digital thermostats make this transition feel effortless. You simply tap a screen or press a button, and the digital display instantly changes colors from orange to blue. However, the physical equipment sitting outside your home cannot instantly adapt to that split-second digital command. Your heat pump is a complex piece of heavy-duty machinery that operates under immense pressure.
When you ask your system to abruptly change its entire cycle, you are putting a massive strain on a critical component known as the reversing valve. This highly pressurized part gets caught in the middle of these temperature swings. Without giving the system adequate time to rest and equalize, you risk triggering emergency lockouts, severe mechanical wear, and a home that is left with neither heating nor cooling when you need it most. Patience at the thermostat is the ultimate key to preventing costly mechanical failures.
The Mechanical Reality: What Happens Inside the Reversing Valve
To understand why patience is so important, you have to look at what is actually happening inside your outdoor unit. The transitional climate here in Delran NJ forces this mechanical shift more frequently than in regions with abrupt seasonal changes. With our chilly early fall mornings and surprisingly hot afternoons, your heat pump is asked to do double duty on a daily basis.
Many homeowners assume that switching from heat to cool simply flips an electrical switch or reverses a fan motor. In reality, the reversing valve is a heavy-duty physical slider mechanism made of brass. Its sole job is to redirect the flow of high-pressure refrigerant through your system. When in cooling mode, it directs the refrigerant to absorb heat from inside your home and release it outside. When in heating mode, the internal slider physically shifts position, reversing that flow to absorb ambient heat from the outdoor air and release it indoors.
High-Pressure Refrigerant Flow
This shifting process is not gentle. The refrigerant flowing through these copper lines is under immense pressure—often hundreds of pounds per square inch (PSI). The compressor drives this entire process, pumping the refrigerant forcefully through the lines.
When the system is running, there is a distinct high-pressure side and a low-pressure side. For the reversing valve to safely slide from one position to the other, those extreme pressure differentials need time to settle. If the valve tries to move while the system is fully pressurized, it is like trying to open a heavy door against hurricane-force winds. The valve must seat properly in its new position before the compressor resumes full operation, otherwise, the entire refrigeration cycle is compromised.
• Actively Heating or Cooling — Refrigerant Pressure: Highly unbalanced (High side vs. Low side) — Reversing Valve Status: Locked firmly in position
• Turned OFF (Waiting 5-10 mins) — Refrigerant Pressure: Equalizing naturally throughout the lines — Reversing Valve Status: Ready to slide safely
• Rapidly Switched (No wait) — Refrigerant Pressure: Violently fighting opposing pressures — Reversing Valve Status: Struggling, stuck, or jammed
The Anatomy of a System Lockout Following a Rapid Switch
When you impatiently flip your thermostat from cool to heat without waiting, you set off a chain reaction of mechanical stress. The system does not just ignore the command; it attempts to execute it under impossible physical conditions. Here is the exact timeline of what happens when a rapid switch triggers a system lockout.
1. The Immediate Signal: Your thermostat sends an instantaneous electrical signal to the control board to reverse the cycle. Because the system was just running, the refrigerant pressures are still highly unbalanced between the indoor and outdoor coils.
2. The Physical Blockage: The solenoid coil on the reversing valve energizes and attempts to pull the internal brass slider into the new position. However, because the pressure has not equalized, the slider gets stuck against the immense force of the refrigerant lines.
3. The Compressor Strain: The compressor kicks on, expecting the valve to be in the correct position. Instead, it pushes high-pressure refrigerant against a partially closed or jammed valve. This creates a massive spike in pressure and electrical amperage as the compressor works twice as hard to overcome the blockage.
4. The Hard Lockout: To prevent catastrophic failure, such as a blown compressor motor or ruptured refrigerant lines, the system's internal safety sensors detect the pressure spike. The control board immediately cuts power to the compressor, initiating a hard lockout. Your system shuts down completely to protect itself, leaving your home without any conditioning until it is properly reset.
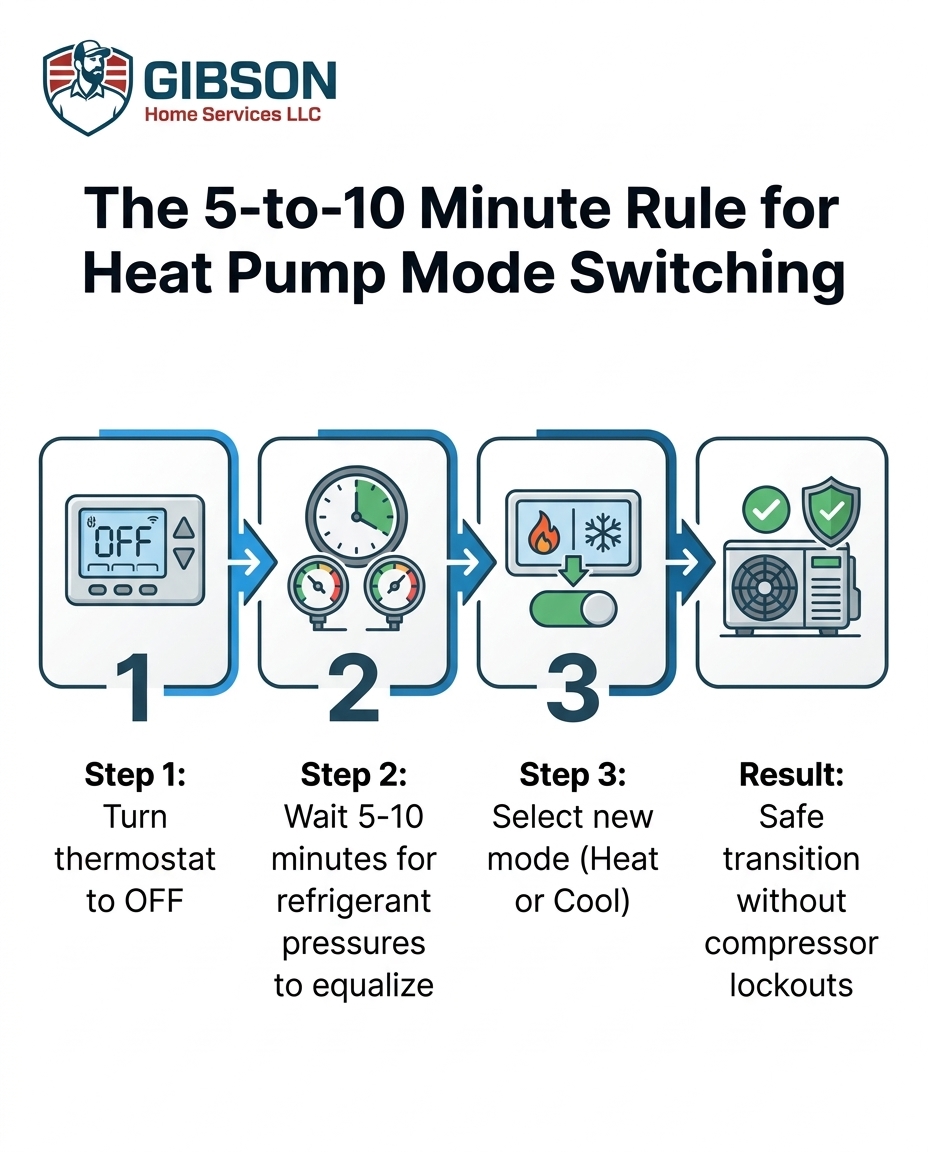
The 5-to-10 Minute Equalization Rule to Protect Your Equipment
The good news is that preventing a system lockout and protecting your reversing valve is entirely within your control. You simply need to build a small buffer into your routine when adjusting the temperature on volatile weather days. We call this the equalization rule, and following it will significantly extend the lifespan of your outdoor unit.
Just as you might read about proper system sizing and careful handling in a guide to AC installation, understanding the operational limits of your equipment after it is installed is just as important. Here is the exact process you should follow when transitioning your system.
1. Turn the system to OFF: Do not just tap the mode button from "Cool" directly over to "Heat." First, switch the thermostat entirely to the "OFF" position.
2. Wait 5 to 10 minutes: This is the mandatory waiting period. During this time, the high-pressure and low-pressure sides of the refrigeration cycle will naturally bleed together and equalize. You will often hear a soft hissing or gurgling sound from the outdoor unit as this happens.
3. Engage the new mode: Once the 10 minutes have passed, the internal pressures are balanced. You can now safely switch the thermostat to your desired mode (heat or cool) and set the temperature.
4. Listen for a smooth startup: When the system kicks back on, the reversing valve will slide effortlessly into place, and the compressor will start up without drawing excessive electrical current.
This simple delay prevents unnecessary wear and tear. It ensures that the brass slider inside the valve never has to fight against hundreds of pounds of pressure, keeping your home comfortable without risking an unexpected breakdown.
Warning Signs Your Reversing Valve is Already Compromised
If you have historically flipped your thermostat back and forth without waiting, your reversing valve may have already sustained mechanical damage. Because this component is hidden inside the outdoor cabinet, you have to rely on secondary symptoms to know if it is struggling. Catching these issues early during routine heating maintenance can save you from a complete system failure in the dead of winter.
Watch for these distinct warning signs that indicate your reversing valve is compromised:
• Stuck in one temperature mode: The most obvious sign is a system that blows cold air when set to heat, or warm air when set to cool. If the valve is physically jammed halfway or stuck in its default position, the refrigerant cannot reverse direction, no matter what the thermostat says.
• Loud hissing or groaning noises: While a quiet hiss during equalization is normal, a loud, sustained hissing, groaning, or grinding noise coming from the outdoor unit during a cycle transition means the valve slider is struggling to seat properly against the pressure.
• Defrost cycle failures: During colder nights, your heat pump briefly switches into cooling mode to melt frost off the outdoor coils. If the reversing valve is failing, the system struggles to enter or exit this automated defrost cycle, leading to a unit encased in solid ice.
• Frequent tripped breakers: If the compressor has to fight a stuck valve, it draws a massive amount of electricity. This power surge will frequently trip your circuit breaker or trigger safety lockouts that require manual resets at the electrical panel.
Why Reversing Valve Repairs Require Professional Diagnosis
If you suspect your reversing valve is stuck or damaged, you must resist the urge to open the outdoor cabinet and attempt a fix yourself. This is not a DIY project. The reversing valve is deeply integrated into the sealed refrigeration loop of your heat pump, making it one of the most complex components to service.
One local homeowner recently reached out during a tricky spring transition when they needed a complete ductless heat and air system installation. Our team provided a detailed estimate, scheduled the work promptly, and completed the installation professionally. That same level of structured, professional care applies to diagnosing and repairing a stuck reversing valve. It requires specialized knowledge and tools that go far beyond standard maintenance.
First, accessing and replacing a reversing valve requires recovering and recharging the chemical refrigerant. Handling these chemicals mandates strict EPA certification. Venting refrigerant into the atmosphere is illegal and dangerous. Furthermore, diagnosing the issue requires expertise. A bad run capacitor, a faulty thermostat wire, or a failing solenoid coil can all mimic the symptoms of a bad reversing valve. Misdiagnosing the problem leads to wasted time and unnecessary parts.
Finally, the physical replacement process is incredibly delicate. Technicians must use high-temperature brazing torches to un-weld the old valve and install the new one. Because the internal slider is sensitive to extreme heat, professionals must use specialized heat-sink techniques—like wrapping the valve in wet rags or using heat-blocking paste—to prevent destroying the new valve while brazing it into place. This level of precision is why you should always rely on expert air conditioning services for internal mechanical repairs.
Frequently Asked Questions About Heat Pump Mode Switching
How long should you wait before switching from AC to heat?
You should wait a minimum of 5 to 10 minutes before switching your thermostat from air conditioning to heating. This brief pause allows the highly pressurized refrigerant lines to naturally equalize. Waiting prevents the compressor from starting under extreme strain and protects the internal reversing valve from jamming.
Can you switch from heat to cool right away?
No, switching from heat to cool instantly forces the outdoor equipment to shift gears while under immense mechanical pressure. Doing so can cause the internal safety sensors to trip, leading to a complete system lockout. Always turn the system off and wait for the pressures to balance first.
What happens if I switch my thermostat too fast?
If you switch your thermostat too rapidly, the reversing valve attempts to move against un-equalized refrigerant pressure and often gets stuck. The compressor then pushes against this blockage, causing electrical spikes that can trip your circuit breaker or trigger a hard safety lockout that shuts the entire system down.
Why did my heat pump stop working when I switched to heat?
Your heat pump likely went into a safety lockout because it was switched over before the internal pressures could settle. When the compressor detects a dangerous pressure spike or draws too much amperage trying to force the cycle reversal, the control board cuts power to prevent permanent motor damage.
How do I know if my reversing valve is bad?
The most common sign of a bad reversing valve is a heat pump that is permanently stuck blowing cold air in heating mode, or warm air in cooling mode. You might also notice loud hissing noises from the outdoor unit, a system that constantly trips the breaker, or an outdoor coil that freezes solid because the defrost cycle cannot engage.
Will a compressor lockout reset itself automatically?
Some modern systems have a soft lockout feature that will automatically reset after a designated waiting period, usually 30 minutes to an hour. However, if the system experiences a hard lockout due to repeated rapid switching or a physically jammed valve, it will require a manual reset or a professional diagnostic visit to clear the error code.
Fast Relief for Heat Pump Lockouts During Early Fall
A locked-out heat pump is incredibly frustrating, especially when the September weather is shifting rapidly between hot and cold. However, a system lockout is not the end of the world—it is your equipment doing its job to protect the vital compressor from catastrophic failure. If you followed the 5-to-10 minute rule and your system is still refusing to condition your home, or if it is permanently stuck in one temperature mode, it is time to bring in professional help.
We understand that sudden no-heat or no-cool situations rarely happen at convenient times. That is why our team provides 24/7 emergency service availability for sudden system lockouts during these unpredictable seasonal shifts. Do not wait until the deep winter cold sets in to find out your reversing valve is compromised. Schedule a thorough inspection today, and let our experts ensure your system is fully prepared to handle whatever the changing seasons bring.
Latest articles
Discover more articles

How Rapidly Switching Between Heat and Cool Modes Damages Your Reversing Valve
Crisp fall mornings and warm afternoons make it tempting to constantly flip your thermostat. Giving your heat pump a brief rest between cycles prevents system lockouts and costly valve damage.
Why Your AC is Running but Not Cooling After a September Power Surge
Severe late-summer storms can leave your indoor fan running while the outdoor compressor fails. Find out how dual run capacitors handle power spikes and the safest way to restore your home's cooling.
Upgrading to a Variable-Speed Blower vs. Single-Stage for Better Fall Humidity Control
If your house feels cold but clammy during mild autumn weather, your AC might be short-cycling. See why upgrading your blower motor solves this sticky problem.